A couple of weeks ago I had my very first award experience. Until then I was an award virgin and I had never really thought about them, let alone considered the fact that I would ever receive one. I was overwhelmed with all sorts of mixed emotions. First of all, I was incredibly flattered and really appreciated the gesture, which came from a wonderful fellow blogger that I really liked. Who doesn't want to be commended for their efforts in blogland? I am still finding my way in the blogosphere so anything positive anybody has to say about me is really good for my ego and inspires me to do more posts.
So, where is this award, you may wonder. Well, here's the thing: I politely refused. I felt really guilty about it, even though the giver took it like a champion. The thing is: awards come with strings attached and I have never liked praise that comes with a price, if you know what I mean. In order to receive my award I in turn would have to pass it on to a couple of other bloggers and so forth and so forth. Of course I know this is the way it works in the wonderful world of blogs, but it's not how it works in my world. In my world praise is free, compliments are given without conditions and when I scratch your back I would like it if you said thank you, but you need not necessarily scratch mine.
I have no idea if anybody else is ever going to feel the need to give me an award again, but just in case someone felt an incling I promised the generous giver of my first one that I would post a little note on my sidebar about it, so I wouldn't have to feel guilty over refusing other awards and nobody else would ever be tempted to give me one in the first place. It took me a few weeks, but I made a little picture that says 'award free zone', so people know in advance that I don't 'do' awards.
Actually I am almost seriously considering starting the no-strings-attached-award or something like that, where you get to be praised to kingdom come and don't have to do anything in return! Wouldn't that be cool? I don't know if such an award would have any status to the receiver, especially if it came from me, but the idea behind it really speaks to me. Well, that's something to ponder for the future maybe...;-)
Finally I want to say that I really appreciate all the comments I get both here and on flickr, yahoo groups or just through my private mail. I can't tell you enough how all of them make my day. I love it that people take the time to read my blog, watch my artsy stuff and then even consider it worth their while to say something about it to me. So in case it wasn't clear already: thank you thank you thank you ;-)

Thursday, March 31, 2011
Wednesday, March 30, 2011
What are you up to wednesday
My second contribution to "What are you up to today?". For more info see the sidebar.

I just finished writing the envelopes for the cards of the iHanna swap and they will go into the mail tomorrow. Yay! I have also just received the first card in this swap, so it looks like things are going smoothly. Yay again!
I also just finished a little quicky work on paper, dedicated to my cat who is quite sick right now and may have to be euthanised (oh just the thought of this is horrible). I will show this piece in more detail in my next post together with a journal page on the same subject (not a happy one I'll admit).
On the left you can see one of my favorite art supplies: neocolor II watersoluble crayons. I have been in love with them for years now and I think this love is here to stay! Actually, my blow dryer and I are inseparable too, it's a love triangle. ;-)
Monday, March 28, 2011
Little houses tutorial
As promised I am going to show you how I did my little cities/little houses in mixed media. Now please keep in mind this is my first tutorial, so if something is not clear please don't hesitate to ask any questions, preferably in the comments section, because then other people can profit from them too. Here we go!
What you need:
Stage 1 - Torn paper background:

Take your decorative papers and tear some of them to pieces. Then apply them to your substrate with gel medium. Make sure the entire substrate is covered and that the papers are all over the place! Let this be the fun-who-cares-what-it-looks-like part of your work. I used the same papers in my background as I did for the houses in the foreground, but you can choose to use different papers or just left overs. The layer of paint that you apply later will mostly neutralize the colors, but not the patterns (the paint is transparent remember?). By the way, you don't need to cover or seal the paper with the gel medium, it will be covered by paint and gesso anyway.
Stage 2 - Some gesso dabbing

Take a paper towel or a piece of cloth, dip it in some gesso and that dab the gesso randomly on the surface. Don't cover everything. You're looking to create some structure, nothing more. Let dry, or, if you're like me, get out a blow dryer and make it dry faster. ;-)
Stage 3 - First layer of paint

Take your pencil and draw a wavy line about 1/3 from the bottom of your substrate. This will be the line your houses will stand on. It is also the line that will divide the first two colors of paint. Choose a color for the bottom (the ground) and one for the top (the sky) and just apply an even layer with a paint brush. Now we wait for the paint to dry and move on to the next stage.
Stage 4 - Second layer of paint

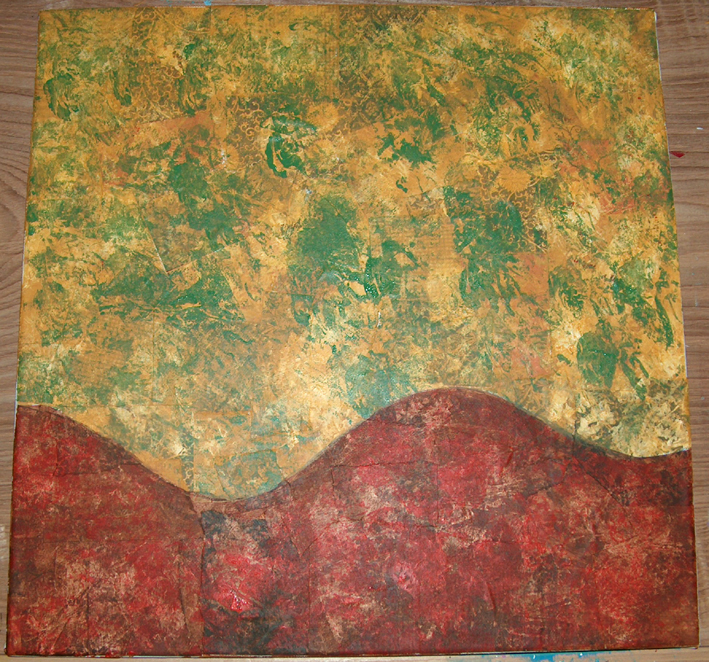
Take two other colors of paint. Again one for the bottom and one for the top. Take a piece of paper towel or a piece of cloth and start dabbing again. Be sure to keep the colors for bottom and top seperate (I used a piece of paper for this cut along the pattern of the wavy line). I used red on top of the brown at the bottom and green on top of the ochre on the top in this example. Here's a little close up of the top:

Because the paint is transparent you can still see the patterns of the papers underneath. I really like that effect. Especially because these patterns will return in the houses. It gives a little balance to the piece and brings it together.
Stage 5 - Cutting the houses and other elements

Now comes the part where you get to 'build' your city. I kind of wish I had taken more pictures of this stage, but I hope my words will make clear how I work. First cut out the base of the houses, which are basically rectangles of different sizes. Place them on the wavy line and cut off the bottoms in such a shape that they match the line. I paste them down one at a time. By this I mean I will cut a shape and then paste it down, cut the next shape and then paste that down, etcetera etcetera. I don't plan out how the thing will look in advance.
After I do all the bases like this (I vary them in size and shape for a playful effect) I start doing the roofs. Some are rectangles, some are dome shaped or minarets. Whatever takes your fancy. You can draw them in with pencil first to make sure they fit the bases. I paste these down one at a time too.
After this it's time for the doors and the chimneys. For some reason I want the paper of my doors to be the same as that of the chimneys. Why? I have no clue whatsoever! ;-) And finally I cut out little windows. As you can see these have different shapes too. Be playful. No architect is coming to check if your houses can stand up to building regulations!
When the houses are standing it's time to fill up the ground and the sky with some extra collage elements. I cut different size circles for the ground and stars for the sky and paste them down. All the pasting by the way is done with gel medium.
When all the elements are down and dry. I add a thick layer of gel medium to cover everything up and protect it from outer influences. I use matte medium, but of course you could choose to use gloss or semi gloss, whatever appeals to your taste. Now it's back to waiting for things to dry again. Make sure the medium is completely dry before you go on to the final stage or you will ruin your markers!
Stage 6: the final touches

This is the stage where your city comes to live. Use your white marker to draw little clouds of smoke coming out of the chimneys. Then use the black marker to outline all the elements of the collage as if you were drawing the houses, the circles and the stars. I put little swirls in the circles for an extra effect. I divide some windows into smaller sections. I draw some crosses on top of churches rooftops. When all this is done I make little dots with the white marker on the bottom to give a little more pattern to the ground. Let your markings dry, sign your work and...you're done! Your very own little city has been built!
You may use a (spray) varnish to finish up your work or just leave it as it is.
I hope this was a clear enough tutorial to explain the process. I am open to suggestions for improvement in case of future tutorials and again: if you have any questions, don't hesitate to ask. If you happen to make one of these cities of your own I would love to see it, so let me know about your own little city adventures!
What you need:
- a substrate of some kind like paper or canvas, whatever you choose has to be able to take thick layers of paint and collage
- gel medium
- decorative papers (make sure you have at least five different ones that match well together)
- gesso
- a pencil
- four colors of transparent acrylic paint that match or complement the paper
- paper towels or pieces of cloth to dab paint on with
- scissors
- brushes
- a black marker (I used a sakura glaze pen, but any black permanent marker will do)
- a white paint marker (or decomarker, or anything white that wil dry opaque on acrylic paint)
Stage 1 - Torn paper background:

Take your decorative papers and tear some of them to pieces. Then apply them to your substrate with gel medium. Make sure the entire substrate is covered and that the papers are all over the place! Let this be the fun-who-cares-what-it-looks-like part of your work. I used the same papers in my background as I did for the houses in the foreground, but you can choose to use different papers or just left overs. The layer of paint that you apply later will mostly neutralize the colors, but not the patterns (the paint is transparent remember?). By the way, you don't need to cover or seal the paper with the gel medium, it will be covered by paint and gesso anyway.
Stage 2 - Some gesso dabbing

Take a paper towel or a piece of cloth, dip it in some gesso and that dab the gesso randomly on the surface. Don't cover everything. You're looking to create some structure, nothing more. Let dry, or, if you're like me, get out a blow dryer and make it dry faster. ;-)
Stage 3 - First layer of paint

Take your pencil and draw a wavy line about 1/3 from the bottom of your substrate. This will be the line your houses will stand on. It is also the line that will divide the first two colors of paint. Choose a color for the bottom (the ground) and one for the top (the sky) and just apply an even layer with a paint brush. Now we wait for the paint to dry and move on to the next stage.
Stage 4 - Second layer of paint
Take two other colors of paint. Again one for the bottom and one for the top. Take a piece of paper towel or a piece of cloth and start dabbing again. Be sure to keep the colors for bottom and top seperate (I used a piece of paper for this cut along the pattern of the wavy line). I used red on top of the brown at the bottom and green on top of the ochre on the top in this example. Here's a little close up of the top:

Because the paint is transparent you can still see the patterns of the papers underneath. I really like that effect. Especially because these patterns will return in the houses. It gives a little balance to the piece and brings it together.
Stage 5 - Cutting the houses and other elements

Now comes the part where you get to 'build' your city. I kind of wish I had taken more pictures of this stage, but I hope my words will make clear how I work. First cut out the base of the houses, which are basically rectangles of different sizes. Place them on the wavy line and cut off the bottoms in such a shape that they match the line. I paste them down one at a time. By this I mean I will cut a shape and then paste it down, cut the next shape and then paste that down, etcetera etcetera. I don't plan out how the thing will look in advance.
After I do all the bases like this (I vary them in size and shape for a playful effect) I start doing the roofs. Some are rectangles, some are dome shaped or minarets. Whatever takes your fancy. You can draw them in with pencil first to make sure they fit the bases. I paste these down one at a time too.
After this it's time for the doors and the chimneys. For some reason I want the paper of my doors to be the same as that of the chimneys. Why? I have no clue whatsoever! ;-) And finally I cut out little windows. As you can see these have different shapes too. Be playful. No architect is coming to check if your houses can stand up to building regulations!
When the houses are standing it's time to fill up the ground and the sky with some extra collage elements. I cut different size circles for the ground and stars for the sky and paste them down. All the pasting by the way is done with gel medium.
When all the elements are down and dry. I add a thick layer of gel medium to cover everything up and protect it from outer influences. I use matte medium, but of course you could choose to use gloss or semi gloss, whatever appeals to your taste. Now it's back to waiting for things to dry again. Make sure the medium is completely dry before you go on to the final stage or you will ruin your markers!
Stage 6: the final touches

This is the stage where your city comes to live. Use your white marker to draw little clouds of smoke coming out of the chimneys. Then use the black marker to outline all the elements of the collage as if you were drawing the houses, the circles and the stars. I put little swirls in the circles for an extra effect. I divide some windows into smaller sections. I draw some crosses on top of churches rooftops. When all this is done I make little dots with the white marker on the bottom to give a little more pattern to the ground. Let your markings dry, sign your work and...you're done! Your very own little city has been built!
You may use a (spray) varnish to finish up your work or just leave it as it is.
I hope this was a clear enough tutorial to explain the process. I am open to suggestions for improvement in case of future tutorials and again: if you have any questions, don't hesitate to ask. If you happen to make one of these cities of your own I would love to see it, so let me know about your own little city adventures!
Wednesday, March 23, 2011
What I'm up to today
A wonderful initiative by Jen Osborn: posting what you are working on every wednesday. You can read more about it here or click on the What are you up to today button on the sidebar.
Anyway, here's what I'm up to today:

A little mess on my work table. I am getting to the finishing touches on the cards for the iHanna-swap. I have mounted them on cardstock and will now put a stamp on the back so they look like 'real' postcards. I took out the stazon ink so I can get started right after I finish this post! I love stazon!
I am also starting two little booklets as my next project. I just picked out some paper for them the other day from my stash. They will be ROD-style probably and I am getting the parts together before I start sewing. They will get a fabric cover too, but in a different way, more directly attached to the rest of the notebook. On the right you can see some velvety rub ons that I just received through the mail and still need to find a home for in my studio.
Hope many more people join this fun initiative! I love to see work in progress.
P.S. I changed the look of my blog just a little, have you noticed?
Tuesday, March 22, 2011
Mixed media houses go canvas and become Little Cities
I have been working really hard lately on a series of four pieces in which I wanted to put my little houses to the canvas. As you may remember I started them in my journal just as simple drawings in pen and feltip pen and then I tried out one picture in mixed media, but on paper. When that turned out right I figured it was time to go for the 'real thing' and put them on canvas. So over the past two weeks I spent many an hour putting the following four pieces together:


The canvasses measure 40x40 cm. I call them 'Little City', no. 1 to 4.
I am very pleased with how they turned out even if they did cost me two glaze pens! No matter what other people tell you, Sakura's glaze pens (and I love those pens!) don't last long if you really use them, they were empty in no time. ;-) The paper I used is actually the really cheap paper that I showed on my shopping spree post not so long ago. This just goes to show that expensive isn't always better.
I intend to do a little tutorial on how I did these canvases in one of my next posts. They take some time, but they are really easy to make, so maybe somebody else might like making them too. I would love to see other people try them. They are such fun!
It was again cool to work on several pieces at once, but also frustrating, because there was so little to show in the meantime. Maybe that's why I needed a little break from them to make the postcards for iHanna's swap.
Anyway, they are done now. Whatever will be next?
Saturday, March 19, 2011
iHanna's postcard swap - part two
Well, they are finished. I made eleven cards in total, one more than required, which means one of these cards will go to my mail art pal Monk, but I'm not saying which one! There has to be a little surprise left ;-)


Now all I have to do is mount them on some cardstock (to hide the stitching in the back, although I think that's kinda cool) and wait for iHanna to send me some addresses of other participants. I can't wait to see what will turn up in my mailbox!
Thursday, March 17, 2011
iHanna's postcard swap - part one
It was one of those split second decisions to join the wonderfully creative iHanna's 2011 postcard swap. The minute I joined I just had to get started right away. Luckily I had just finished my little sewing room, so this project will go down in history as the first project I will complete in that room. Because...it's not completed yet. That's why this is part one, see?
If you want to know more about iHanna or her swap please visit her site which is absolutely fabulous. Inspiration galore! If you want to know more about the swap itself you can click the button on my sidebar.
Anyway, here's the first five cards I made. They totally spring from left over inspiration from Mary Ann Moss' ROD class about which there is also information on the sidebar. Who knew sewing paper would be so much fun? Some credit also goes to Traci Bautista who through her lovely book 'Collage Unleashed' introduced me to the possibility of sewing paper with a sewing machine in the first place.


I think you can call these cards machine stitched collages. No glue whatsoever was used. What you can't see very well in the scans is how for instance the butterfly wings stand loose from the card which gives them a wonderful 3D effect. The photographs on te cards are fragments of bigger photographs that I took which just proves you shouldn't throw away lousy pictures. Most (not all) show scenery from my island. The ticket stubs, with which I am absolutely in love, are by Tim Holz.
Five cards down, five to go. Well, actually I only have two cards to go, but for the sake of balance I thought I would divide the ten evenly between two posts. So, the other five will be on my next post. Until then!
Tuesday, March 15, 2011
In waiting of work to be finished
It's almost ironic how not so long ago I wrote about the art making process and how I usually work on one thing at a time. See, now that I am having several work stations I have been trying out the other approach of working on more than one thing and I am liking it very much, but...I have so little to show for it yet.
I am working on four mixed media canvasses around my little houses. I am working on two journal spreads, which will be the last in my heart journal which is practically full. And I have just recently joined iHanna's postcards swap which is putting me in the direction of trying sewn postcards, which means, yes, I have started using my brand new sewing room. I am having a wonderful time doing all these things and I am working really hard at them, but nothing is finished yet.
The only thing I did finish last week is the following journal page:

It's an altered magazine photo on a background of neocolor. It was a little something to pass the time while waiting for something else. Just like this blogpost!
Saturday, March 12, 2011
Studio make over and the making of a sewing room
Brace yourselves, this is going to be a long post!
Not so long ago I showed you how I turned my dining table into an art journaling station. I am still pretty pleased about that, but of course once you get going with things like this the mind starts to ponder even more possibilities to change things around. I blame Ricë, I blame Lynne Perella's wonderful book on studio spaces, I blame the flickr group The Everyday Studio, I blame anybody who ever posted a video tour of their studio on youtube, I blame myself. But hey, I'm not accusing anybody ;-) Whoever is to to blame, I have been thinking about my studio. A. Lot.


It's a little hard to take good pictures of it, because it's such a small room, but as you can see I moved the little cabinet from the studio into this room, opened it up and removed the old sewing machine and replaced it with my new one. I also had the brilliant idea to put my ironing bord and iron ready to use in this room, because nothing is more annoying than having to go downstairs and get all that stuff ready just to iron out one little thing you sewed together. As you can also see there is a chandelier hanging there. I let it hang, because I love it so, but I fear my head is in for some very traumatic experiences ;-)


Not so long ago I showed you how I turned my dining table into an art journaling station. I am still pretty pleased about that, but of course once you get going with things like this the mind starts to ponder even more possibilities to change things around. I blame Ricë, I blame Lynne Perella's wonderful book on studio spaces, I blame the flickr group The Everyday Studio, I blame anybody who ever posted a video tour of their studio on youtube, I blame myself. But hey, I'm not accusing anybody ;-) Whoever is to to blame, I have been thinking about my studio. A. Lot.

First, let me say there is/was nothing wrong with my studio. I know I am pretty fortunate to have one at all and I am even more fortunate that it's a reasonable size for what I do (15 m2) and that my stuff mostly fits in there. I know there are people who have to work from their kitchen table and clear the stuff away when it's dinner time and I know that some of you are happy to just have a shelf to yourself. So I am quite spoiled already.
But I have been thinking about how I am even more fortunate than I realize and have not taken enough advantage of it. I live alone in a regular row house with three bedrooms and until recently I basicly used only one room to make art. Why? I guess I was blinded by the fact that I had a studio in the first place, I don't know... Making the art journaling station was a big step forward. Now it's time to move on to even bigger things.
So..yesterday I took a day off for a little (big?) makeover project in my house. The goal: to rearrange some things in my studio and (the best part) to make an actual sewing room! I thought this might take me two days, but I finished it all in one (be it a long one).
Let me do it the way the professionals do it and show you some before pictures:
One is already shown above and shows my studio about a week ago while I was working on a set of mixed media paintings/collages. More about those later in life, they are not finished yet, but you can see some sneak peeks here and there ;-) Here's the things I wanted to change:
First of all this little piece of furniture stored a sewing maching, an old one I never used anymore. I wanted to make that cabinet suitable for my new sewing machine and leave it open so I always have acces to my sewing machine when I want to. But that wouldn't work in my studio, so it had to move to somewhere else.

The second thing was the presence of all these blue boxes that I got once when I temporarily lived in an apartment with very little space. There was still some stuff in there from ten years ago! They needed clearing out. They needed a new purpose.

And finally there was the case of the overflowing shelf with journals! I swear not one more journal would have fitted in. They needed a new home. Of course I connected this problem with the soon to be empty boxes and ideas formed...

Now here's the uprofessional thing: I forgot to take pictures of the before situation in my soon to be sewing room! I totally meant to take them, but I was so busy clearing things out and moving stuff about that by the time I remembered, the room was already half empty. Let me just say it is a smal room that held a comfy chair and a book case and I dubbed it my reading room, but....I never ever sat there!
So to work I went and that meant going through a lot of stuff. Most stuff was in the boxes of course, even though during the years I had taken many things out. Whenever you do a project like this things always have to get worse before they get better. Soon my studio looked like this:
 |
| (I have no idea what that white thing in the bottom is!) |
Let me tell you that that was not the only garbage bag that got filled! I tossed so many things, some were easy (ten year old porcelain paint anyone?), some were hard (handmade cards, old paintings). But it felt good to get rid of stuff and see more and more empty boxes around me. The stuff I wanted to keep I put in a big plastic crate to find a home for later on.
When the boxes were empty it was time to go through all my journals. So I started sorting them chronologically.

I didn't count them at the time, but looking at the picture I counted over fifty books already and that's not even all of them! They span about fifteen years of writing and art journaling. It was tempting to go look through all of them, but I resisted the urge in order to save time. But it sure made me happy to see all those books!
Well, I worked and worked and cleared out and rearranged and moved furniture about and at the end of the day I had my very first real sewing room and here it is:

It's a little hard to take good pictures of it, because it's such a small room, but as you can see I moved the little cabinet from the studio into this room, opened it up and removed the old sewing machine and replaced it with my new one. I also had the brilliant idea to put my ironing bord and iron ready to use in this room, because nothing is more annoying than having to go downstairs and get all that stuff ready just to iron out one little thing you sewed together. As you can also see there is a chandelier hanging there. I let it hang, because I love it so, but I fear my head is in for some very traumatic experiences ;-)

That's the right side of the room. You can see by the ironing board how narrow it really is. The only thing I kept the same in this room are the bookshelves. I had no other place to put them and oh well, books look good everywhere don't they? You can also see that I moved the blue boxes into this room. They now store all my journals and some art materials that I could not let go off, but don't need to have on hand either. One and half box is still empty for future journals.

In the corner next to the door I placed some furniture to hold trinkets and fabrics. There's another little cabinet on the right of the sewing machine. I had tons and tons of fabrics still lying unused and now they are more in the open and ready for art making or any other purpose I think of. And yes, that's my ROD journal lying there with some photo's I want to put in it.
Here's that corner in a little more detail:

I put some books on sewing and fabric in there and the old spice rack I want to fill with beads and other little bits and bobs to decorate fabrics with. The little wicker thingy will be used for more decorative pieces of fabric and small swatches. By the way, most of my furniture consists of hand me downs and thrift store buys. I love hand me downs!
I can't tell you how please I am to finally have a real sewing room!
Now there was of course still the matter of the studio, that was in chaos after all this redecorating. The boxes gone, the little sewing machine cabinet gone, lots of junk lying around. Let's see how that all worked out:

It worked out just fine! There you have it, a whole new outlook on the left wall of my studio. And I am pretty pleased with myself I tell you. See, I a made some wishes come true for myself in here too.
First of all: I now have a comfy chair in this room! Something that I have always wanted but thought was impossible to incorporate. Turns out it wasn't ;-)

Yes, this is the comfy chair from the reading room turned sewing room! Is that cool or what?
If you look closely you can see another little wish of mine coming true:

Yay, I now have a little spot to make tea! Now this is the only thing that I bought in this entire make over process: a second water heater! I have one in my kitchen of course, but now I don't have to drag up and down with cups and pots and stuff. I can just make tea as I work. It's such a little thing really, but it's so big for me at the same time. Yes, I am a little silly, I know!
Well, now I'm at it I might as well show you the rest of the studio the way it is now even though not everything was changed.
Here's my computer desk with my wonderful blue IKEA bookshelves. I love the bold blue color of this furniture. It still makes me happy everytime I look at it, as do the books in it of course ;-)

I moved some things around in the studio as well. Most is invisible to the eye because it's done behind the doors of cabinets, but this chair is in the open:

I know, you can hardly see it's a chair. It now stands where the blue boxes were before. Stacked on top of it are a bunch of old clothes that I wear when I paint. I don't know how some people can paint with just an apron on. I smear that stuff everywhere so I need old clothes that I can just wipe my hand off on if need be (and it need be sometimes, yes). On top of the pile is a left over pillow and a stuffed animal my mother made many years ago. You can also see that after I did all this makeover stuff I put postcards on the wall to liven them up a little.
Now to the other side of the room:

That's a storage cabinet and my old work table which I always thought was way too small, but now is ideal to let things dry or just put something away for a short while to use later. The stuff that was left over from the blue boxes was put in the white boxes you see here. I left them open. I have learned through practice that open boxes invite use way more than closed ones. Dust be damned ;-)
The inside of the cabinet had a little make over too. In here were the journals and the fabrics and they both moved to the other room, so I could rearrange things a little.

The top shelf now holds my photography stuff. I threw away two old compact camera's (with a little pain in my heart I admit) which I never used anymore. The middle is now filled with the magazines I use for collage (these used to be on top of the sewing machine cabinet). The bottom (which you can't see) was filled with fabrics and is now filled with portfolio's, empty photo albums and half done books and stuff like that. You know, work in progress or stuff to use for another day.
Well, that's all folks. It was a hard working day and it was well worth it. I still have some details to sort out (like how many paint brushes does a person really need?), but the grand scheme of things is done to my liking. I am really happy with this and I hope you enjoyed my little tour.

Tuesday, March 8, 2011
Tree love
Why am I so fascinated by trees in winter? I like trees with leafs on them too, but not as much as I like them without. There's something so beautifully desolate about them that I just can't resist.
When I encounter a beautiful leafless tree I just have to take a picture of it:

Sometimes even the shadow of it's branches is enough to get me all swept away:

And if there's a bonus of black birds, well, that's just enough to make my day:


When I encounter a beautiful leafless tree I just have to take a picture of it:

Sometimes even the shadow of it's branches is enough to get me all swept away:

And if there's a bonus of black birds, well, that's just enough to make my day:

But I'm not too choosy, branches without birds will do fine as well:

And as if the outside world does not offer enough barren trees, I need to make some of my own too:


Conclusion: a life can never have too many trees! ;-)
Thursday, March 3, 2011
Not so extreme home make over
A short while ago the wonderfully outspoken Ricë Freeman Zachery (her blog Notes from the Voodoo Cafe is in my blog roll) and a friend of hers started a flickr group on real life studio's called The Everyday Studio. If you don't know about it yet, check it out here and if you want to: join and upload your own studio pictures. I don't know about you, but I love to look at other people's studio's.
The group is meant to be a response to all those too good to be true studio's you see in magazines and books that look really good and exceptionally pretty, but you wonder how anybody can get any work done with them being so neat and clean and tidy. It just does not seem realistic.
Of course I put up photos of my studio on this group too, even though some of them are a little outdated. I plan to do a post on my studio some time in the future and take new photographs then, but if you want to see the older pictures just go to my flickr set here.
All this looking at other people's houses and studio's got me to thinking about mine of course. Especially the way Ricë herself seems to have dedicated her entire house to her art and writing was really inspiring to me. In my house there are signs of my artsyness just about everywhere, but when it comes to the actual work I usually keep to my studio. I love my studio, no doubt about it, but sometimes even this luxury does not seem luxurious enough. I notice this mostly when doing my (art) journaling. I usually write downstairs and do the rest in my studio upstairs (my studio is originally the master bedroom of my house).
The funny thing is that I have art supplies downstairs for art journaling. I just never use them. And I have been thinking why that is. The answer can be found in the next photograph.

This is my dining table (on which I never dine by the way). It is in the kitchen. The art supplies are right there. But can you see them? No, neither can I. The wonderful thing about my studio is that everything is in the open. If it's stuck in boxes somewhere I don't use it unless I plan ahead. So on the above picture you can see, if you look very closely, one tin of watercolor. My journal is lying closed on the table (bottom left corner) with my tote of pens and stuff on top of it. So I can write and I can draw a little, but when it comes to pasting things and cutting up papers and stuff I need to go through a lot of trouble (or what feels like a lot of trouble). See, all the rest of the supplies are in the blue boxes. The boxes are closed and I never take them out, because I always feel that when I have done so I need to clean all the stuff up again after I'm done and put the boxes back in their neat little pile.
Looking at Ricës house made me wonder how I could learn a little from her. I mean, I never use this table for entertaining. I hardly ever sit at it myself except to write in my journal in the morning. It's mostly just standing there. On the rare occasion I have visitors we never sit at it and I even eat dinner in the living room (yes, I'm one of those eat-on-the-couch people). I live alone, so why not make a little more effort to even more adapt the house to my own preferences (and it's pretty adapted already, trust me, haha).
So I decided to start up a second workstation, next to the one upstairs in my studio and dedicate it to art journaling alone. That way I don't have to alternate between my seperate pieces and the art journal at my main work table and I can just leave the journal open and have everything I need at hand. So, after some rearranging and moving some stuff away from the dining table and other stuff on to it, it now looks like this:

Now, let me first tell you that this didn't take any money, except five euro's for the table cloth, because I wanted to keep the wood safe from acrylic paints. But other than that it was cost free. I just hauled some stuff from upstairs, I opened the boxes and use the lids now as boxes too and I got the smaller sets of watercolor pencils, crayons, etc. from upstairs to play with downstairs. I also got some of the cheaper papers and some ephemera and some decorative tapes from upstairs and of course some magazines to cut up.
Because the picture was just taken after I finished this little make over it still looks really tidy, but the idea is that I can leave the journal there while working on it and so can easily get to it in between chores or other stuff without having to clean up or go through any trouble opening boxes and closets.
This may be the first step into turning my entire house into an art studio! I already have ideas in my head for a real little sewing room upstairs! ;-)
Subscribe to:
Posts (Atom)