
What you need:
- a substrate of some kind like paper or canvas, whatever you choose has to be able to take thick layers of paint and collage
- gel medium
- decorative papers (make sure you have at least five different ones that match well together)
- gesso
- a pencil
- four colors of transparent acrylic paint that match or complement the paper
- paper towels or pieces of cloth to dab paint on with
- scissors
- brushes
- a black marker (I used a sakura glaze pen, but any black permanent marker will do)
- a white paint marker (or decomarker, or anything white that wil dry opaque on acrylic paint)
Stage 1 - Torn paper background:

Take your decorative papers and tear some of them to pieces. Then apply them to your substrate with gel medium. Make sure the entire substrate is covered and that the papers are all over the place! Let this be the fun-who-cares-what-it-looks-like part of your work. I used the same papers in my background as I did for the houses in the foreground, but you can choose to use different papers or just left overs. The layer of paint that you apply later will mostly neutralize the colors, but not the patterns (the paint is transparent remember?). By the way, you don't need to cover or seal the paper with the gel medium, it will be covered by paint and gesso anyway.
Stage 2 - Some gesso dabbing

Take a paper towel or a piece of cloth, dip it in some gesso and that dab the gesso randomly on the surface. Don't cover everything. You're looking to create some structure, nothing more. Let dry, or, if you're like me, get out a blow dryer and make it dry faster. ;-)
Stage 3 - First layer of paint

Take your pencil and draw a wavy line about 1/3 from the bottom of your substrate. This will be the line your houses will stand on. It is also the line that will divide the first two colors of paint. Choose a color for the bottom (the ground) and one for the top (the sky) and just apply an even layer with a paint brush. Now we wait for the paint to dry and move on to the next stage.
Stage 4 - Second layer of paint
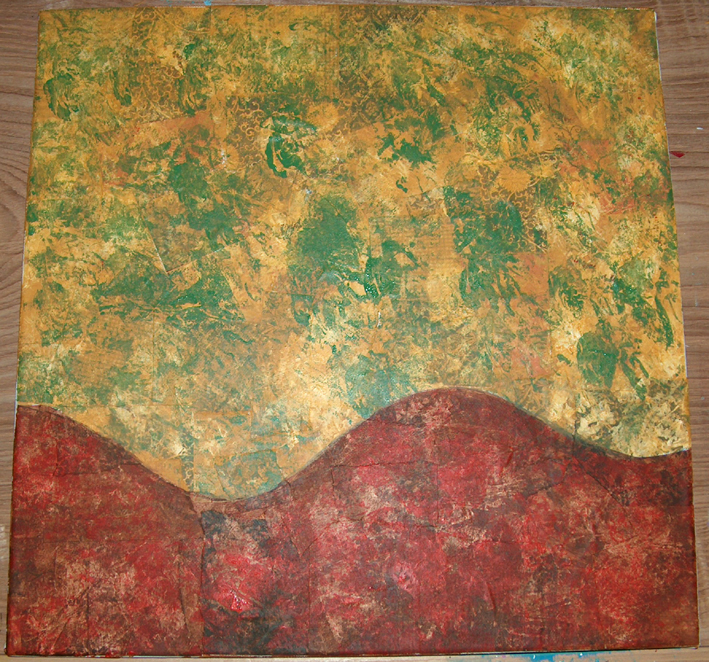
Take two other colors of paint. Again one for the bottom and one for the top. Take a piece of paper towel or a piece of cloth and start dabbing again. Be sure to keep the colors for bottom and top seperate (I used a piece of paper for this cut along the pattern of the wavy line). I used red on top of the brown at the bottom and green on top of the ochre on the top in this example. Here's a little close up of the top:

Because the paint is transparent you can still see the patterns of the papers underneath. I really like that effect. Especially because these patterns will return in the houses. It gives a little balance to the piece and brings it together.
Stage 5 - Cutting the houses and other elements

Now comes the part where you get to 'build' your city. I kind of wish I had taken more pictures of this stage, but I hope my words will make clear how I work. First cut out the base of the houses, which are basically rectangles of different sizes. Place them on the wavy line and cut off the bottoms in such a shape that they match the line. I paste them down one at a time. By this I mean I will cut a shape and then paste it down, cut the next shape and then paste that down, etcetera etcetera. I don't plan out how the thing will look in advance.
After I do all the bases like this (I vary them in size and shape for a playful effect) I start doing the roofs. Some are rectangles, some are dome shaped or minarets. Whatever takes your fancy. You can draw them in with pencil first to make sure they fit the bases. I paste these down one at a time too.
After this it's time for the doors and the chimneys. For some reason I want the paper of my doors to be the same as that of the chimneys. Why? I have no clue whatsoever! ;-) And finally I cut out little windows. As you can see these have different shapes too. Be playful. No architect is coming to check if your houses can stand up to building regulations!
When the houses are standing it's time to fill up the ground and the sky with some extra collage elements. I cut different size circles for the ground and stars for the sky and paste them down. All the pasting by the way is done with gel medium.
When all the elements are down and dry. I add a thick layer of gel medium to cover everything up and protect it from outer influences. I use matte medium, but of course you could choose to use gloss or semi gloss, whatever appeals to your taste. Now it's back to waiting for things to dry again. Make sure the medium is completely dry before you go on to the final stage or you will ruin your markers!
Stage 6: the final touches

This is the stage where your city comes to live. Use your white marker to draw little clouds of smoke coming out of the chimneys. Then use the black marker to outline all the elements of the collage as if you were drawing the houses, the circles and the stars. I put little swirls in the circles for an extra effect. I divide some windows into smaller sections. I draw some crosses on top of churches rooftops. When all this is done I make little dots with the white marker on the bottom to give a little more pattern to the ground. Let your markings dry, sign your work and...you're done! Your very own little city has been built!
You may use a (spray) varnish to finish up your work or just leave it as it is.
I hope this was a clear enough tutorial to explain the process. I am open to suggestions for improvement in case of future tutorials and again: if you have any questions, don't hesitate to ask. If you happen to make one of these cities of your own I would love to see it, so let me know about your own little city adventures!