Wednesday, December 5, 2012

The Big ATC Tutorial - part three - mixed media collage

Well, here we are, halfway through our five part ATC Tutorial. I'm hoping you are enjoying it so far and that it's giving you some ideas of your own. Today we will do a series of four atc's in a more mixed media style. We will again be using the background that we made in part one. Let's go!

The Big ATC Tutorial - part three - mixed media collage

Materials used:
  • some atc-backgrounds that were made in part one of this tutorial series
  • an old book (any old book with images you find interesting that you don't mind tearing up, yes this tutorial is not for the faint of heart)
  • scissors
  • a circle template (anything with which you can draw some different size small circles will do)
  • acrylic paint
  • spray paint (I used a textile spray paint, but that's just because that's the only one I have)
  • acrylic gel medium 
  • a brush
  • regular markers or felt tip pens (I used tombow dual brush markers)
  • glaze pens (Sakura, I don't know of any other brands, but I suppose this would work with other types of gel pens too, they just would not give the shiny and 3D effect)
  • some small shiny metal trinkets in a shape you prefer (I used little flowers)
  • some paper towel


Before I did anything to my atc backgrounds I got out this book, because I knew I wanted to use it. It's an old botanical book which is full of drawn illustrations of plants and flowers. I got it at a flea market for next to nothing and I knew it would come in handy for collage and mixed media (and it does). In the bottom right corner you see the words 'Botanical Bliss). Those came to me while making the cards and I thought it would be a good title for the atc's that I was making in this tutorial series, so I wrote it down before I forgot. The curse of a mind full of ideas is that you are destined to forget half of them and only execute about ten percent of those that are left. ;-)

I used a circle template to outline some images in the book  that I wanted to cut out and use on my atc's. Aren't those illustrations gorgeous?

I cut out several images that way in different size circles and I also cut out some text. The text describes the family of plants these particular flowers belong to. I knew I wanted to use these elements for collage, but I had no idea yet how.

Now it was time to get to work on the atc's themselves. I noticed that the color of the paper of the book didn't really match my background so I decided to do a colorwash on them with some watered down acrylic paint. Just mix paint with water and brush on.

I still wasn't happy about the effect and decided to ad some paint spray. The spray I used is intended for textiles, it's some generic brand from a company I order stuff from sometimes, so I can't really give you a brand name. I sprayed some yellow and orange and then dabbed it with a paper towel.

I loved the effect, but what I didn't love is the fact that this textile spray is awfully sticky after use (a reason I don't recommend it on paper, even though the colors are lovely and bright). However, this was easily solved by brushing a layer of gel medium on top of  the cards. Still, if you have an acrylic spray paint or something else that is waterproof I would sooner use that. You could also use drops of ink.

Here's a close up of how the background now looked. I liked it a lot better, but unfortunately it still did not match with the color of the book paper. Somehow I just couldn't get it to work. The paper was just too... vintage. ;-)

I figured if I couldn't get the background to work out I should alter the book paper. So I got out my Tombow markers and coloured the cut out items in bright colours! That's how easy a solution sometimes can be. After that it all fit perfectly.

I made a simple collage on the cards with three circles and one line of text. I applied the pieces with gel medium and went over them as well to seal them in. For this reason alone it was good that the paper of the book was so absorbent, otherwise the markers would have smeared when they got wet as they are water soluble.

I made four different, yet similar arrangements in different colour variations. I liked where this was going now.

Since I always have an incredible need to outline things I had to do it with these cards too. Out came the old black glaze pen again (what did I ever do without it?) and my signature dashed lines. ;-)

I still found the card a bit too empty so I added dots in a glaze pen in a different color. This also gave a bit more texture to the surface. I used a different color on each of the cards for a bit more variation.


Here's how the cards looked after that. I still wasn't completely convinced. It just wasn't enough.

When in doubt, ad a little sparkle. So I got one of my boxes of shinies and sparklies and decided to ad some to the cards to make them a little more interesting.

I applied some tiny metal flowers in bright colors with some gel medium. Please keep in mind that the gel medium is not dry yet in this picture, so it still looks white. When it's dry you will now longer notice it.

And there you have them. Four new cards to ad to the the four I showed you yesterday. Eight cards in total. We are on a roll!

Can you see how different these cards are from the ones from yesterday and yet how they still are according to the same theme of flowers? I hope you like them and that they gave you some inspiration for some mixed media atc's of your own.

Tomorrow we will focus on the last set of cards that are again very different. Hope to see you then!

Until then I wish you a wonderful and artsy day!

Tuesday, December 4, 2012

The Big ATC Tutorial - part two - drawing with paint markers

So yesterday I showed you how I made twelve atc-backgrounds from one sheet of paper. Now it's time to show you how to make some actual atc's! I made three kinds of atc's and that means four atc's of each kind (I'm such a math prodigy). Today, tomorrow and Thursday we will be looking at how you can use one background in different ways. I'm hoping it will inspire you to see that there is more than one way to finish a project. (But I'm sure you already knew that.)


The Big ATC Tutorial - part two - drawing with paint markers

Before I start on this first series of atc's I just want to say that in making them I chose to use the theme of 'flowers', so all atc's have flowers on them one way or another. That's just 'cause that's what inspired me at the time. It also shows how you can execute a theme in different ways and yet have the cards be related to each other. Often trade groups will set a theme or prompt for a series of atc's so I thought it might be interesting for you to see that you can approach a theme in different and yet connecting ways.

Materials used:
  • atc-backgrounds made in part one of this tutorial
  • any black marker (or a pencil) to draw your first outline with, just use whatever is on hand
  • paint markers (I used UniPosca, but this will work with any reasonably opaque pen, I think Sakura's souffle pens might be a good alternative)
  • a black glaze pen (by Sakura, I'm not sure if there are other brands, but you could also use a 3D paint for even more effect or just any black marker for less effect)

I took a black permanent marker and started drawing some flowers on the background. I just drew simple shapes from my imagination. ' Simple'  was the key word in this first series of atc's

I coloured the image in with paint markers. I love paint markers. They will write on anything and are completely opaque which means they will cover whatever is underneath them. The ones I have also last quite a long time.

I made a border on the bottom with a paint marker, because I felt it lacked something there. I also did another layer on the already coloured parts by adding accents in a different colour. Here you can see how opaque the markers are, the light green completely covers the dark green.

I then got out my black glaze pen. Glaze pens are wonderful for outlining things. They have a little shine to them and just a tad of a three dimensional effect. You can't really see that in this picture...

.....which is why I made this one so the light could shine on it right. Just this bit of extra shine and shape gives the card a little oomph it otherwise would not have. It keeps it from being too flat. I can imagine that real 3D paint would give an even more dramatic effect.

I added an inspirational word and another border at the top of the card. Those I outlined with a glaze pen as well.

Just a bit of a close up to show the texture of the background coming through the drawing. Somehow it works.
 
I added some last details to the borders of the card and with this I considered it done.

After that I made three more atc's in the same style, but with different colours, different words and differently shaped flowers. Here they are:


I know that there are  plenty of atc makers who do exactly the same card several times, but that's just not my style. For me a series consists of cards made according to the same concept, but they are never copies of one another. Each card I make is really unique.  I just like the idea of that. 


And that concludes my first set of atc's! Now that wasn't so hard was it? I hope I gave you an idea for some simple but fun and colourful cards. It might be a good way to start this way, just some drawing and coloring, before you bring out layers and layers of goods to impress people. ;-)

Tomorrow we will be doing some more mixed media type cards and some collage. Hope to see you then!

For now I wish you a wonderful and artsy day!

Monday, December 3, 2012

The Big ATC Tutorial - part one - the background

It's been a long time since I did a tutorial so I'm making it up to you by making it a five parter! Yes, I know I said last week it would 'only' be four parts, but I somehow managed to make it five. ;-) And it's all going to be about atc's.

This tutorial was made because of this:

 
You may remember that at the beginning of the year I started my Stolen Ideas Project, where I randomly (through a little personal lottery system) pick an artsy book and let myself be inspired by it for a project or some experimenting. I have done three stolen ideas so far. Two I have shared on this blog and can be found here and here. The third one was a writing exercise that was a litle too personal to share from a book by Julia Cameron. And a while ago I picked the above book by Bernie Berlin about atc's. I hadn't done atc's in ages, so I pretty much just let that be the only inspiration for this project: make some atc's. I did not actually use any ideas from the book, the sole thing I 'stole' was the concept of making atc's again.  ;-)

For those of you who don't know what atc's are: they are Artist Trading Cards and they are for trading with other artists. The most important thing you need to know about them right now is that you do not sell them and that they always measure 2 1/2 by 3 1/2 inches (or 6,4 by 8,9 cm). I will talk a little more about the trading in part five of the tutorial. And for finding out more about their history and general background I gladly refer you to wikipedia.

So here's how this five part tutorial will go: I will be posting every day this week, well Monday to Friday that is, and the five parts will cover the following subjects:
  • in part one (today, Monday) will cover the making of an interesting background from which we will be cutting twelve atc's
  • in part two (Tuesday) we will make our first set of four atc's using mostly paint markers and a glaze pen
  • in part three (Wednesday) we will make a second set of four atc's doing collage with book paper and some shiny trinkets
  • in part four (Thursday) we will do the third and last set of four atc's using watercolor and watersoluble crayons and also some collage
  • in part five (Friday) we will finish up by talking about backing our atc's and what to do with them now they are finished

I hope you will enjoy this week of posts. Now...let's get started!

The Big ATC Tutorial - part one - the background

Materials used:
  • a big sheet of sturdy paper that can take wet media (I used heavyweight paper intended for acrylic paint)
  • watersoluble crayons (I used Caran d' Ache Neocolor II)
  • gesso
  • a tear off paper palette (or anything flat you can spread paint or gesso out on)
  • at least one reasonable size brush for spreading out gesso and paint
  • something to make patterns with (I used a pattern roller, foam stamps and bubble wrap)
  • decorative paper
  • a good glue (I used acrylic gel medium by Talens Amsterdam which I personally like better than Golden)
  • a cheap or old brush you don't mind getting glue on
  • a circle template (or any other shape you like, I just happen to be a circle freak)
  • acrylic paint (I used Talens Amsterdam, but any old craft paint will do)
  • paint markers or any other (opaque) markers or gel pens (I used UniPosca acrylic paint markers)
  • a pen or pencil to line out your cards
  • some left over sturdy paper for making a template
  • a ruler (for measuring your template)
  • a pair of scissors to cut your cards from the sheet

Important note: 
Please use what you have, there's usually an alternative in your stash or a way around spending unnecessary  cash. I hate for people to have the feeling they need something before they can join in. Be creative and inventive in your material choices. Remember it took me over twenty years to accumulate all the stuff I have, you don't need to do it in one splurge. I'll try to give alternatives where I can. 

I took a big sheet of heavyweight paper intended for acrylic paint. This sheet is a little over A3 size. I started by covering is with random markes of several colors of Neocolor II's , which is a brand of watersoluble crayons that I'm absolutely in love with.

Instead of diluting the crayons with water, I diluted them with gesso. This gives a wonderful chalky and soft effect. If you don't have watersoluble crayons, you can also mix your acrylic or craft paint with gesso for a similar result.

I got out my first pattern maker.  I have a couple of these pattern rollers, but you can use anything you like that leaves a more or less steady pattern. Think stamps or even just the lids of jars or different kinds of bubble wrap. Or maybe you have stencils you can use and some spray paint.

I used gesso to make a first pattern and covered my entire sheet with it. I usually put a blob of gesso on a tear off palet and spread it out with a brush. Then I can roll the pattern roller through the gesso and apply it to the background paper.

I got out some cute decorative papers and tore pieces from them. I then glued them to the background with acrylic gel medium. If you don't have gel medium just use any good glue that is water resistant (a glue stick will probably not do). I apply the medium with a brush and also go over what I glue down, so the paper is sealed in.

Now with the help of a circle template I cut circles from more decorative papers. It's nice if you have some different size circles. If you don't have decorative papers, you could think about making your own by putting marks and patterns on loose sheets of paper with watercolor, paints, pens and markers. Or use similar colors from magazine cut outs. The sky's the limit. If you don't have a circle template you can use glasses, lids, caps or anything else that is circular.

I spread the circles out over the background paper and glued them down, again with gel medium.

Now I got out my paint markers and started drawing around the circles. I made some flowers, see? If you don't have paint markers you can use gel pens or permanent markers. Paint markers are more opaque which is why I love them.

Now I got a foam stamp with a circle pattern and started stamping with a contrasting color of acrylic paint. I love foam stamps. They work really well with acrylic paint. I used the same technique as with the pattern roller and the gesso, meaning I spread out some paint on a paper palette and then stamped into that with the foam stamp so it would be covered at once. No ado with brushing the paint on the stamp or anything like that.  Did you know that the left over paint on the palette (with the pattern of the stamp still left in) makes a wonderful print on a clean (or not so clean) piece of paper? You can start a whole new background just by doing that!

Time to get my hands dirty with some more acrylic paint. I chose two bright colors. I always grab the pinks and purples!

With my fingers I made these stripes with the paint. It's nice to work with your fingers!  Of course there's no need to make stripes, you can fingerpaint any shape and size you want. ;-)

You don't need fancy stamps or pattern rollers for mark making. How about some bubble wrap? I stamped these dots with gesso and some left over bubble wrap, because I wanted to unify the background a little more.

I got out another paint marker and started drawing swirls around the green stamped circles from a few layers before. I didn't do this with all the circles, just a lot of them. This gave a nice random pattern. Again you can use gel pens or any kind of maker that is waterproof. After this I considered the background finished. Now the fun really begins!

 I took a small piece of sturdy paper and made a template the size of an atc. I turned my background paper and traced around that template on the back and tried to get as many atc's out of it as I could.  The point however is not to do it nice and neatly. Lay down your template sideways and diagonally at different angles. The reason for this is that you will get to see your background in a whole new way when you turn them around. Let it happen on its own. Don't plan it out.

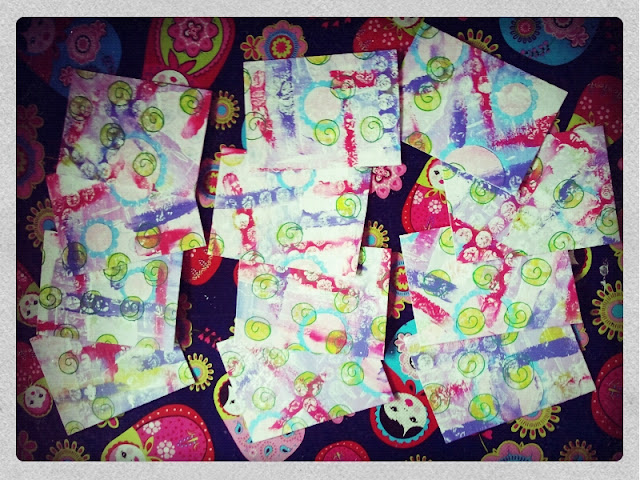
Now I cut out the shapes I just traced and there you go! A whole bunch of atc backgrounds! I managed to get twelve out of an A3 sheet of paper. That is not the most economical amount, but it does give me the most variation from one background and that's what matters more to me than the quantity of cards.

And with that we end this first part of our series of atc tutorials. If you have any questions you would like to ask please feel free and I hope you will do it in the comment section (instead of the mail), so other people can profit from them as well. It also helps me to see if something is not explained clearly enough, so don't hesitate to speak up if something is unclear.

The coming three days I will show you how I made three different kinds of atc's from this one background. Hope you come and see how they unfold!

Wishing you a wonderful and artsy day!


Friday, November 30, 2012

Photography Friday

Autumn is passing. Slowly but steadily the branches of the trees are getting more and more empty. I'm showing you some of the last fall colors before they are gone. I will miss them.


What I do love about more and more leaves falling is the thick carpet they leave on the forest floor. So soft and colourful to walk on. So beautiful. And also I am looking forward to winter and to even shorter days than there already are. I'm such a none summer person that autumn and winter are like one big holiday to me. Even though spring is still four months away I'm already feeling time is speeding too fast. In a few weeks it will be Christmas already! Can't fall and winter stay all year this season? Just once? Please? ;-)

Wishing you all a wonderful and artsy weekend and do come back next week for my atc-tutorial!